
Hydro service approval steps for Quonset building sites

If I want hydro connected to a Quonset site without delays, I need to lock in four things early: the site sketch, the meter location, the service route, and the permit/inspection order.
A Quonset building can make hydro approval harder because the curved steel shell affects meter mounting, conduit routing, bonding, and overhead clearances. In many cases, I may need a framed end-wall setup, a service post, or a meter pedestal instead of mounting gear on the curved shell.
Here’s the short version:
- I start with a clear site sketch that shows property lines, the building footprint, doors, the nearest utility source, and the full service route.
- I place the meter on the straight end-wall, usually near the utility side, with about 1 m of working space in front and meter height around 1.5 m to 1.8 m above finished grade.
- If I go underground, I plan for trench cover in the 600 mm to 900 mm range, utility locates, conduit, warning tape, and spacing from gas and telecom.
- If I go overhead, I check clearance at the lowest sag point and keep lines away from doors, drive-through zones, and tall farm equipment.
- I do not backfill before inspection, and I do not expect connection before final approval and utility release.
A few numbers matter right away: underground service can cost up to 10 times more than a similar overhead line, commercial driveways often need about 5 m overhead clearance, and gas relief device spacing is often 1 m for natural gas and 3 m for propane.
| Step | What I need to do | What can go wrong |
|---|---|---|
| 1 | Send a dimensioned site sketch to the utility | Missing measurements, unclear route, no buried services shown |
| 2 | Pick a meter and entry location that inspectors can access | Meter on curved shell, blocked access, poor gas clearance |
| 3 | Set the route and meet trench or overhead clearance rules | Shallow trench, bad conduit path, low conductors over traffic areas |
| 4 | Book permit, inspection, and utility work in the right order | Backfilling too soon, late permit, failed final inspection |
So the main point is simple: I get fewer delays when the Quonset layout and electrical plan match the approved utility sketch from the start.
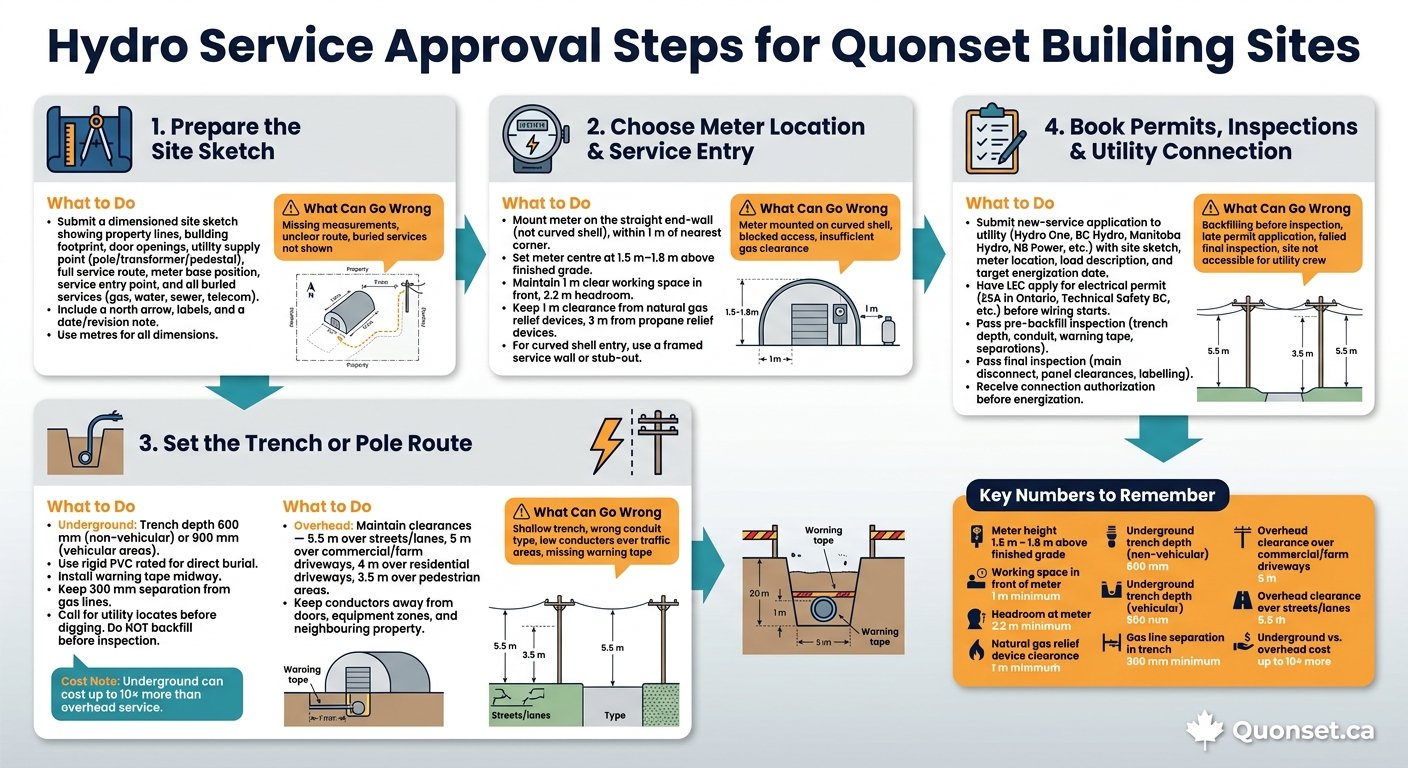
Hydro Service Approval Steps for Quonset Building Sites
Step 1: Prepare the site sketch the utility will review
A site sketch is part of the new-service submission. It doesn’t need to be a professional plan. But it does need to be clear, dimensioned, and complete.
Show property lines, building footprint, and the utility supply point
On the sketch, show the lot dimensions, road frontage, driveway location, distances to lot lines, and the nearest supply point. Add the Quonset building footprint and door openings on the same drawing. Then mark the nearest supply point – a pole, transformer, or pedestal – and show the route to the building.
Because the curved steel wall limits where equipment can go, make the service entry side of the building easy to read on the drawing.
Use metres for every dimension. Add enough fixed measurements – like building-to-property-line distance and meter-to-building-corner distance – so an inspector can check them on site without guessing.
Next, use the same sketch to mark the meter base position, service entry point, and the full route from the supply point to the building.
Mark the meter, service entry, and trench or overhead path
The sketch should clearly show the meter base position, the service entry point, and the full route from the supply point to the building. If the service will be underground, draw the trench line. If it will be overhead, show the span path and the attachment direction on the building.
Also include other buried services on the same drawing:
- gas
- water
- sewer or septic
- telecom
That lets reviewers check routing and separation issues before work starts.
A clean drawing with a north arrow, clear labels for proposed and existing features, and a date or revision note will help keep the application moving. With the sketch done, the next step is picking a meter location and service entry the inspector can reach.
sbb-itb-f008e6e
Step 2: Choose a meter location and service entry that will pass inspection
Pick a meter location with proper working clearance
Put the meter on the straight end-wall, not on the curved shell. On a Quonset building, that usually means the straight end-wall becomes the mounting surface and the curved shell stays out of the plan. Many Canadian utilities say the meter base should go on the straight end-wall closest to the utility source, often within 1 m of the nearest corner.
Set the meter so its centre sits 1.5 m to 1.8 m above finished grade. Leave at least 1 m of clear working space in front of it and 2.2 m of headroom so it can be read and serviced safely.
The area around the meter needs to stay open. That means no snow storage, gates, panels, or equipment blocking access. The ground in front should also be flat and stable.
You also need enough distance from gas equipment. A common rule is at least 1 m from a natural gas relief device or vent, and 3 m from a propane relief device.
Once the meter wall is locked in, the service entry should fit that wall’s structure.
Plan the service entry on a curved steel wall
A curved steel wall makes things trickier, so it helps to build a framed service wall or stub-out. This can be made from dimensional lumber or light-gauge steel and fastened to the Quonset ribs. That gives you a straight, solid surface for the meter base, conduit, and bonding points, and it makes inspection much simpler. The backing also has to be strong enough to carry the equipment and any side load from the service mast.
For overhead service, fasten the mast to the reinforced end-wall or to a framed bump-out, not to the curved roof shell. The mast needs to extend above the roofline so the attachment point meets code. In heavy snow areas, it may also need bracing or guy wires tied to roof structural members.
For underground service, bring the conduit into the straight end-wall section just above the slab or grade. Then use a framed service chase so the conduit can turn upward without breaking the minimum bend radius of 900 mm. Any penetration through the steel skin should be sleeved and sealed with weatherproof fittings. If conduit runs along the metal shell, add spacers to stop rubbing and wear over time.
Since the Quonset shell is metal, bonding and grounding need to be part of the plan from the start. Bond all exposed metal parts – including the meter base, conduit, mast brackets, and any metallic sleeves through the wall – to the grounding electrode system with approved bonding hardware.
After the meter and entry point are set, the next check is the trench or pole route and its clearance limits.
Step 3: Set up the trench or pole route and meet clearance rules
Map the service route from the utility source – such as a pole, transformer, or service pedestal – to the Quonset building entry point. The utility will review that route during service approval, so lock in the route and the installation method before anyone starts digging or setting poles.
Underground service: trench depth, conduit route, and utility separations
Trench depth depends on the area. In many jurisdictions, the CEC calls for about 600 mm of cover in non-vehicular areas and 900 mm in areas with vehicle traffic, though mechanical protection can allow less cover in some cases. BC Hydro also requires a 900 mm minimum burial depth for supply service ducts unless a local distribution engineer approves a reduction.
Use rigid PVC rated for direct burial. Joints should be solvent-welded, and bends need to stay within the manufacturer’s limits. Place the conduit in approved bedding material, then install warning tape midway between the conduit and finished grade so future excavation crews can spot the line.
If the trench runs near a gas line, keep at least 300 mm of horizontal or vertical separation. If that spacing can’t be met, mechanical protection is required.
Call for utility locates before you dig. In Ontario, that means Ontario One Call. Other provinces have similar services. Since locates expire, book them close to the excavation date and photograph the markings before site work wipes them out.
Don’t backfill yet. The inspector needs to confirm depth, separations, and conduit placement first.
Overhead service: attachment height and clearance over driveways and access lanes
For overhead service, the height that counts is the conductor height at its lowest sag point. That matters because sag changes with load and temperature. Typical minimum clearances are:
- 5.5 m across streets, lanes, and alleys
- 5 m across driveways to commercial and industrial premises
- 4 m across driveways to residential garages
- 3.5 m across areas used only by pedestrians
On farm properties, utilities often treat the site as commercial or industrial. That means 5 m is usually the minimum clearance over farm yards and equipment areas. If combines, grain augers, or large trucks pass through the yard, plan for more height. It’s a lot easier to allow for that now than to move a service line later.
Keep conductors away from Quonset door openings, bale handling areas, loading bays, and any spot where tall machinery works. Also, keep the route on your property unless an easement is already in place. If you change the route after approval, the utility may need to review it again.
Overhead vs. underground service: a side-by-side comparison for Quonset sites
Use this quick comparison to choose the route that suits the site.
| Overhead service | Underground service | |
|---|---|---|
| Best fit | Rural and farm sites; existing poles nearby | Drive-through yards; sites with frequent tall machinery movement |
| Key requirements | Sound mast or attachment point; clearances over driveways and equipment paths | Trench depth 600–900 mm; separation from gas, water, and telecom lines |
| Common issues | Insufficient attachment height; conductors over doors or equipment zones; routes crossing neighbouring property | Trench too shallow; wrong conduit type; inadequate separation from gas lines; missing warning tape |
| Access and maintenance | Easier fault location; more exposed to storm damage and machinery contact | Minimal maintenance once buried; repairs require re-opening the trench |
| Typical cost | Lower upfront cost; simpler to modify | Much higher upfront cost – underground distribution can cost up to 10 times more than equivalent overhead lines |
Once the route is approved, book the permit and inspection before backfill or energization.
Step 4: Book permits, inspections, and utility connection in the right order
With the route approved, it’s time to deal with permits, inspections, and utility release.
Apply for service and pull the electrical permit early
Submit your new-service application to your local provider – whether that’s Hydro One, BC Hydro, Manitoba Hydro, NB Power, or another regional utility – as soon as your service size, voltage, and delivery method are confirmed. Include your scaled site sketch, proposed meter location, load description, and target energization date. A complete application usually moves through the system with fewer delays.
At the same time, have your LEC apply for the electrical permit through the right provincial authority, such as the ESA in Ontario or Technical Safety BC. The permit should be in place before most wiring or service equipment installation starts.
Finished grade, driveway access, and meter placement can all affect when the utility sends its crew. If the lane isn’t ready for access, or the meter area is blocked by stored materials, the utility may cancel the visit and book another date. That kind of site issue can slow down crew scheduling and energization.
Inspect before backfill and before energization
Once the site is ready for access, inspection is the next checkpoint. At the pre-backfill stage, the inspector checks trench depth, conduit type, bedding, warning tape, and separation from gas and communication lines. They’ll also look at the meter base mounting, service mast, and grounding.
FortisBC’s conduit installation guidance confirms inspections happen
"after ducts are installed, prior to backfill or concrete encasement"
Don’t backfill until the work passes inspection.
The final inspection covers the main disconnect, panel working clearances, and labelling. After the installation passes, the inspection authority issues a connection authorization. Nova Scotia Power is clear that
"a utility connection will not be made until the installation has received a final inspection and acceptance"
The Canadian Electrical Code also requires inspection approval and a connection authorization before a new installation can be connected. Your LEC or the inspection authority then sends that connection authorization to the utility, which starts crew scheduling.
Layout choices can also affect how fast approval moves.
Use Quonset Canada to connect with Canadian building providers

Quonset Canada connects owners with Canadian building providers who can help line up end-wall layout, meter placement, and service entry before electrical rough-in.
Conclusion: Approval steps that prevent hydro delays on a Quonset site
Once the permit and inspection path is sorted out, the next step is simple: build the site exactly as approved.
Hydro approval tends to move faster when the site sketch, meter location, service route, and inspection timing match the utility’s rules from day one.
With a Quonset building, that coordination matters even more. The curved steel shell can affect meter mounting, service entry, sealing, and mast height, so it’s smart to lock in those details before construction begins.
Most delays come from things that could have been avoided, like site changes after approval, late permits, or failed inspections. Early coordination helps cut rework and keeps the utility review on track.
Quonset Canada connects owners with Canadian building providers for questions and free quotes. Confirm the approved sketch, meter location, service entry, and route before work starts.
FAQs
Who approves my Quonset hydro plan?
The local municipal building department is the main authority that reviews and approves your Quonset hydro and building plans. Their job is to make sure your permit package lines up with the National Building Code of Canada and local bylaws.
If your site plans, engineering stamps, or other documents are missing details or don’t match, you may be asked to send revisions. It’s smart to check with your local building department before you finalize plans or order materials.
Do I need an electrician before applying for hydro service?
Not always. Before you apply, check whether your project needs electrical trade permits and review your municipality’s permit rules as early as you can.
That small step can save time later. If you add electrical systems after the main building permit is approved, the project may need a new permit review anyway.
What most delays hydro connection on Quonset sites?
The main cause is incomplete or inconsistent documentation.
When key details are missing, things slow down fast. That can mean missing dimensions, absent engineering details, or foundation plans that don’t line up with local soil conditions or frost depths. In many cases, that holds up utility and building connections.
Delays also happen when documents don’t match each other. A site plan might say one thing, while the engineering stamp or product specifications say another. And if zoning or development approvals aren’t in place before electrical or building permit applications go in, the whole process can stall.