
Multi-Purpose Quonset Farm Buildings: Buyer’s Guide

If I were buying a Quonset farm building in Canada, I’d focus on four things first: size, doors, snow-load engineering, and the full installed cost in CAD.
A Quonset can work well for machinery, feed, livestock, or shop space because it gives me a clear-span interior and a roof shape that helps with snow. But the wrong width, short doors, weak site prep, or missing engineering can turn a low kit price into a costly mistake.
Here’s the short version:
- Plan around my biggest machine, not my current average one
- Set door height and end-wall layout early, because changes later can cost a lot
- Match steel gauge and anchoring to my municipality’s snow and wind loads
- Pick the right base for frost, drainage, and floor use
- Compare itemized quotes, not just the building kit price
- Check for Canadian P.Eng.-stamped drawings and CSA A660 details
A few numbers matter right away:
- Common clear-span widths often fall between 40 to 80 ft (12 to 24 m)
- A tractor with a cab may need at least a 14 × 14 ft (4.3 × 4.3 m) overhead door
- Closed end walls with openings can add $6,000+ per end
- Quonset buildings can last about 40 to 80 years with proper upkeep
| What I’m checking | What matters most |
|---|---|
| Size | Equipment width, turning room, future purchases |
| Doors | Height, width, end-wall placement, drive-through access |
| Structure | Steel gauge, snow load, wind load, stamped drawings |
| Base | Slab, piers, or floating base, plus frost depth and drainage |
| Quote | Freight, anchors, end walls, engineering, insulation, CAD pricing |
If I get those points right at the start, I have a much better shot at buying a building that fits the farm and still works years from now.
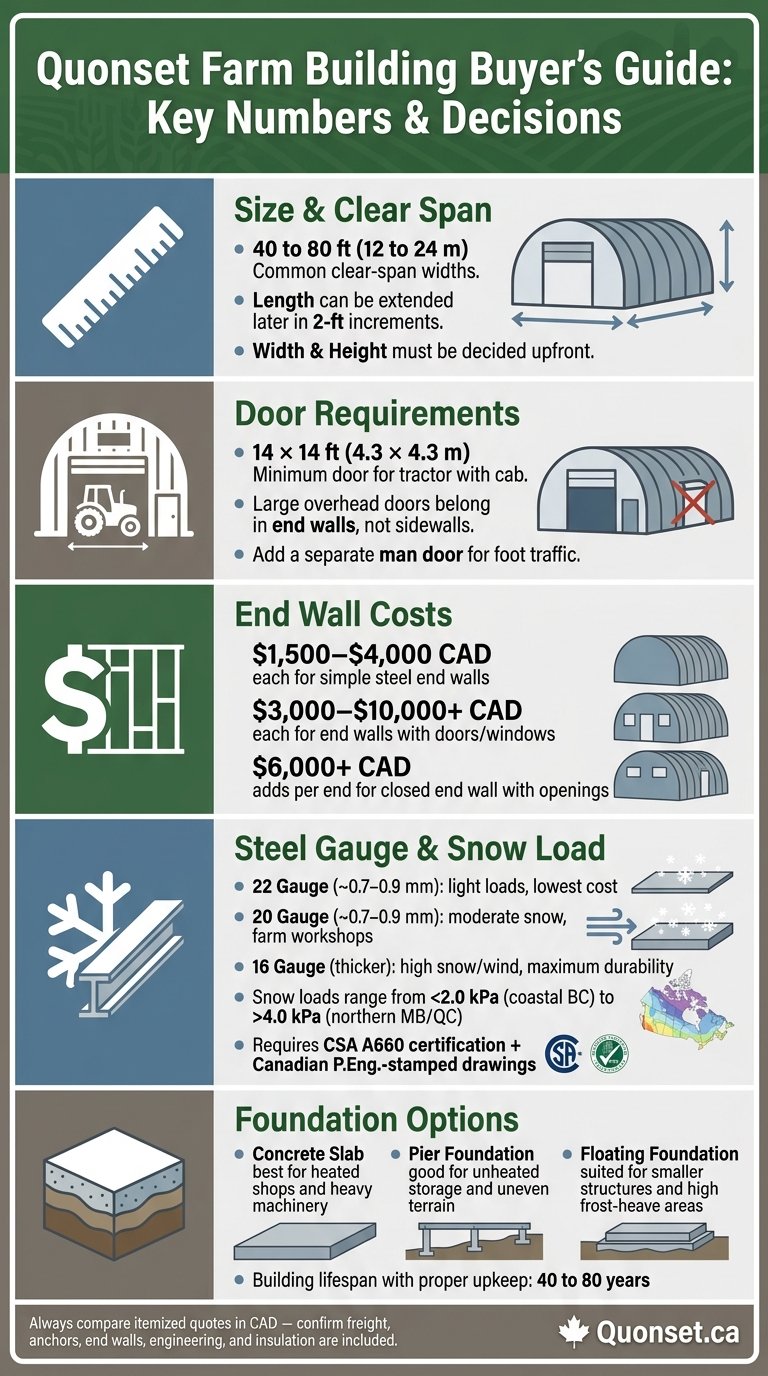
Quonset Farm Building Buyer’s Checklist: Key Specs & Costs at a Glance
Complete Quonset Hut Build – From Site Prep to the Final Arch
sbb-itb-f008e6e
Plan Building Size and Clear Span Around Farm Use
An open span sounds great on paper. But it only pays off if the building footprint fits how your farm runs day to day. Think about daily movement, seasonal storage, and the equipment you may add later. A weak layout at the start can turn into expensive fixes down the road.
Measure Equipment and Storage Needs Before Picking Dimensions
Before you lock in dimensions, measure every machine, trailer, and implement that needs to go inside. Then add room to turn, space to get around each unit, and enough clearance for the biggest machine you expect to own next, not just the one you have now.
In Canada, clear-span widths for farm buildings most often land between 40 and 80 feet (12 to 24 m). Go past that range and a larger building with interior supports can sometimes cost less.
So start with the simple part: let your biggest equipment and storage demands set the footprint.
One useful thing about Quonset construction is that you can extend the length later in 2-foot increments, while the width and height have to be decided up front. If you’re on the fence about length, it’s often smarter to build longer now. That move is usually far less expensive than making structural changes later.
Once the footprint looks right, check one more thing: can your machines actually move through the space without a headache?
Use Door Size and Traffic Flow to Confirm Width and Height
Set the building width and height from your largest door clearance first. Door height should match your tallest machine, plus a bit of extra room. For example, a tractor with a cab will usually need at least a 14 × 14 ft (4.3 × 4.3 m) overhead door.
Doors on both ends can make a big difference. They cut down on awkward backing manoeuvres and can help you split the building into zones, like equipment storage on one end and a workshop on the other.
Plan those end-wall openings before you place the order. Adding a second large door later isn’t a small tweak. It can mean cutting steel, reframing, and getting new engineering work done.
End Walls, Door Layouts, and Interior Access
After you’ve sorted out door height and traffic flow, the next call is the end-wall layout. This choice shapes how equipment moves, how people get in and out, and what the building costs from day one.
Open or Closed End Walls: Which Suits Your Farm Use
End walls account for a big share of the price gap in a Quonset build. A closed end wall with openings can add more than $6,000 per end.
Open end walls make sense for ventilated storage. Closed end walls are a better fit when you care more about security, holding heat, or blocking wind and weather.
Here’s the rough cost range:
- Simple steel end walls: about $1,500 to $4,000 each
- End walls with doors or windows: about $3,000 to $10,000 or more
That jump adds up fast. Doors and windows do more than change price, too. They can reduce insulation performance, and utility penetrations can do the same. If the building won’t be insulated, an anti-condensation liner helps cut down on condensation drip.
One detail that’s easy to miss: structure. A 20-foot opening in a 40-foot end wall needs a heavy header to carry arch loads. So this isn’t just a layout choice. It affects framing, cost, and how much flexibility you have later. Pick an end-wall setup that fits today’s traffic patterns and still leaves space for bigger equipment down the road.
Door Placement for Equipment, People, and Work Zones
Put large overhead doors in the end walls, not the sidewalls. Sidewall openings need more framing and bracing, which pushes up cost and adds complexity. It also affects access and how easy the building will be to insulate or heat.
A separate man door is a smart move. It keeps foot traffic away from the wear, hassle, and risk of opening a heavy farm door every time someone walks through.
If there’s even a small chance you’ll want a second large door later, frame a blocked-out rough opening during the first build. Doing that now is a lot cheaper than cutting into and reinforcing an end wall after the building is finished.
In plain terms, the layout usually breaks down like this:
- Open end walls for ventilated storage
- Closed single-door end walls for secure storage
- Multiple-door end walls for mixed-use buildings
With end walls and door placement set, the next step is matching the structure and foundation to Canadian weather loads.
Steel Gauge, Foundation Type, and Canadian Weather Loads
Once the layout is locked in, the next step is simple: make sure the structure fits local snow, wind, and frost loads.
Steel Thickness and Structural Strength for Farm Buildings
Lower gauge numbers mean thicker, stronger steel. That matters a lot on a farm, because a building used for equipment storage doesn’t face the same stress as a workshop or a mixed-use space.
Heavy snow can push the arch base outward. So steel thickness and foundation anchoring need to work as a team. If one is weak, the whole setup can run into trouble.
The National Building Code of Canada (NBC) assigns a Specified Snow Load in kilopascals (kPa) to every municipality. Ground snow load values can range from below 2.0 kPa in coastal BC to more than 4.0 kPa in parts of northern Manitoba or Quebec. That’s why you should choose gauge based on the municipal snow-load value, not a province-wide average.
| Steel Gauge | Approx. Thickness | Typical Use | Benefits | Trade-offs |
|---|---|---|---|---|
| 22 Gauge | ~0.7–0.9 mm | Light loads, small sheds | Lowest upfront cost; easier to handle | Lower load capacity; prone to deformation under heavy snow |
| 20 Gauge | ~0.7–0.9 mm | Moderate snow loads, farm workshops | Good balance between cost and strength; common for farm use | May need internal reinforcement for very wide spans |
| 16 Gauge | Thicker heavy-duty steel | High snow and wind loads | Maximum durability; handles arch spread and extreme loads | Higher material and freight costs; heavier panels need lifting equipment |
In most Canadian jurisdictions, you’ll need CSA A660 certification and engineer-stamped drawings to show that the chosen gauge and design meet local safety rules. If a quote says nothing about either one, stop and ask before moving ahead.
After gauge comes the base. And that part matters just as much, because the foundation has to carry the load.
Site Drainage, Foundation Type, and Local Weather Design Requirements
Start with the site itself. Grade it well, compact the gravel base before pouring concrete, and keep the finished floor height above grade so water drains away from the base panels.
Frost heave can shift soil enough to cause problems, so the foundation needs to match local frost depth.
| Foundation Type | Best For | Pros | Cons |
|---|---|---|---|
| Concrete Slab | Heated shops, heavy machinery | Finished floor; best moisture control | Highest cost; needs professional finishing |
| Pier Foundation | Unheated storage, ag sheds | Less concrete; works on uneven terrain | No solid floor; interior grading needed |
| Floating Foundation | Smaller structures, high frost-heave areas | Moves with soil to help prevent cracking | Not suited for large or heavy-duty spans |
If the building needs large equipment openings, you may also need thicker concrete edges or reinforced framing to support the concentrated weight of farm machinery. It’s one of those details that’s easy to miss in a quote, but it can affect both cost and long-term performance.
To help prevent sweating and rust, use an anti-condensation membrane or closed-cell spray foam.
These structural decisions shape the final price, so the next step is to compare quotes based on gauge, engineering, and foundation details.
Compare Quotes and Choose for Long-Term Farm Use
Once the design is set, compare full quotes line by line. Don’t look at the kit price alone. What matters is what each quote includes – and what it doesn’t.
Ask each supplier to spell out any exclusions. That includes the foundation, freight, engineering, anchor bolts, base plates, and unloading. You should also confirm the quote is in Canadian dollars (CAD) so you’re not hit with exchange-rate changes later. And make sure it includes Canadian P.Eng.-stamped drawings. Canadian permits need Canadian P.Eng.-stamped drawings.
The simplest way to compare quotes fairly is to use the same checklist every time. That gives you a clear view of the actual project cost, not just the sticker price.
| Quote Item | What to Verify |
|---|---|
| Steel Gauge | Actual gauge number confirmed and matched to site snow and wind load |
| Engineering | Canadian P.Eng.-stamped drawings and CSA A660 included |
| Freight | Delivered to site vs. pickup from the supplier – confirm which applies |
| End Walls | Included or excluded; opening size confirmed |
| Foundation | Anchor bolts, base plates, slab scope, and delivery details included |
| Insulation | Type and R-value specified |
Conclusion: Choose a Building That Fits Today and Grows With Your Farm
A well-maintained Quonset hut can last 40 to 80 years, so this isn’t the place to rush.
Start with the building’s main job. Then size it around your largest equipment and your busiest traffic paths. Pick end walls and door layouts that suit how people, tractors, and other machines will move through the space. Match the steel gauge and foundation design to your municipality’s snow and wind load rules. After that, compare itemized quotes in CAD before you commit.
Choose the building that fits your site, your loads, and the way your farm may change over time. That’s the gap between a building that looks fine on paper and one that does the job day after day. If you’re ready to compare options, Quonset Canada connects Canadian buyers with experienced building providers who can answer site-specific questions and provide free quotes tailored to your farm’s needs.
FAQs
How much site prep will I need?
In Canada, site prep is a big part of the job and usually takes 2 to 7 days, depending on the soil and drainage on your property.
That work often starts with clearing out vegetation, rocks, and organic material. From there, the site needs proper grading so water doesn’t sit around the building. That helps cut down the risk of pooling, rust, and foundation movement over time.
Most projects also need excavation 6 to 8 inches below grade, along with at least 8 inches of compacted gravel to support the base.
Before any work begins, check your local setbacks, zoning rules, and permit needs. It’s also smart to confirm whether your site needs a soil check or foundation review.
Can I insulate a Quonset later?
Yes. You can insulate a Quonset building after it’s built, but in most cases, it makes more sense to plan for insulation from the start. It’s usually easier on the build, easier on the budget, and far less of a headache later.
Because Quonset buildings have curved surfaces, closed-cell spray foam is often the go-to choice for retrofits. It sticks to the metal shell with less fuss and adds thermal insulation along with an air/vapour barrier. Other insulation types can still work, but they often need extra framing, and vapour control can get more complicated fast.
What should I ask for in a full quote?
Ask for an itemized, all-in quote, not a generic price. It should spell out the steel grade, gauge, finish, engineer-stamped drawings, and a CSA A660 certificate for your location and postal code.
The quote should also list every major component, including:
- framing
- panels
- trim
- fasteners
- doors
- windows
- hardware
On top of that, confirm the total delivered cost, freight included. You’ll also want to know if the price is supply-only or if installation is included, and exactly how end-wall openings and framing are priced and handled.